Cooking a wallpaper app from zero to one.

In the last blog, we saw how to make an HTTP request to fetch images and build the UI with some cool animation. If you did not read the previous one, you can start from below. Creating a wallpaper app in Flutter: Part 1 Cooking a wallpaper app from zero to one.medium.com
In this part, we will see how to use Method Channel to write platform-specific code for setting your wallpaper. Before moving forward let’s know a little bit about Method Channel.
Method Channel is a named channel for communicating with platform plugins using asynchronous method calls. The logical identity of the channel is given by its name. Identically named channels will interfere with each other’s communication.
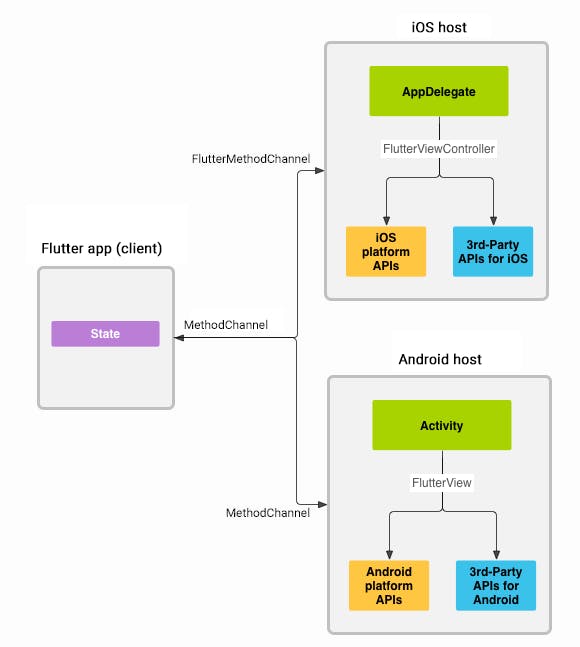
Flutter uses a flexible system that allows you to call platform-specific APIs whether available in Java or Kotlin code on Android, or in Objective-C or Swift code on iOS. Messages are passed between the client (UI) and host (platform) using platform channels as illustrated in this diagram:

First, we will construct the method channel with the specified name.
static const *platform *= const MethodChannel*(*'com.divyanshu.chitr/wallpaper'*)*;
Next, we will create a setWallpaper() function which will invoke our method on the channel with specified arguments.
Future<void> _setWallpaper(int wallpaperType) async {
  var file =
      await DefaultCacheManager().getSingleFile(widget.model.largeImageURL);
  try {
    final int result = await platform
        .invokeMethod('setWallpaper', [file.path, wallpaperType]);
    print('Wallpaer Updated.... $result');
  } on PlatformException catch (e) {
    print("Failed to Set Wallpaer: '${e.message}'.");
  }
 }
The invoke method functions takes a method name and a list of argument. Here we are sending two arguments. One is the file path which we are getting from DefaultCacheManager. Other is the wallpaper type. Wallpaper type is an integer value which specifies whether to set the wallpaper for home screen or lock screen or both. The Value of wallpaper type is: — 1 for the home screen. — 2 for the lock screen. — 3 for both.
Now it’s time to write some Android platform-specific implementation. We are going to use Kotlin here. First, go to your MainActivity.kt file inside your android directory.
Inside the onCreate() method, create a MethodChannel and call setMethodCallHandler(). Make sure to use the same channel name as was used on the Flutter client side.
private const val CHANNEL = "com.divyanshu.chitr/wallpaper"
class MainActivity: FlutterActivity() {

  override fun onCreate(savedInstanceState: Bundle?) {
    super.onCreate(savedInstanceState)
    GeneratedPluginRegistrant.registerWith(this)

    MethodChannel(flutterView, CHANNEL).setMethodCallHandler { call, result ->
      if (call.method == "setWallpaper") {
        val arguments = call.arguments as ArrayList<*>
        val setWallpaper = setWallpaper(arguments[0] as String, applicationContext, arguments[1] as Int)

        if (setWallpaper == 0) {
          result.success(setWallpaper)
        } else {
          result.error("UNAVAILABLE", "", null)
        }
      } else {
            result.notImplemented()
      }
    }
  }
}
Next, we will add the setWallpaper method. Inside setWallpaper method, we will define the WallpaperManager. Using WallpaperManager we will call setBitmap function and provide the bitmap and wallpaper type.
Here is the full code for MainActivity.
package com.divyanshu.chitr

import android.os.Bundle

import io.flutter.app.FlutterActivity
import io.flutter.plugin.common.MethodChannel
import io.flutter.plugins.GeneratedPluginRegistrant
import java.io.IOException
import android.app.WallpaperManager
import android.graphics.BitmapFactory
import java.io.File
import android.os.Build
import android.annotation.TargetApi
import android.content.Context
import io.flutter.Log

private const val CHANNEL = "com.divyanshu.chitr/wallpaper"
class MainActivity: FlutterActivity() {

  override fun onCreate(savedInstanceState: Bundle?) {
    super.onCreate(savedInstanceState)
    GeneratedPluginRegistrant.registerWith(this)

    MethodChannel(flutterView, CHANNEL).setMethodCallHandler { call, result ->
      if (call.method == "setWallpaper") {
        val arguments = call.arguments as ArrayList<*>
        val setWallpaper = setWallpaper(arguments[0] as String, applicationContext, arguments[1] as Int)

        if (setWallpaper == 0) {
          result.success(setWallpaper)
        } else {
          result.error("UNAVAILABLE", "", null)
        }
      } else {
            result.notImplemented()
      }
    }
  }

  @TargetApi(Build.VERSION_CODES.ECLAIR)
  private fun setWallpaper(path: String, applicationContext: Context, wallpaperType: Int): Int {
    var setWallpaper = 1
    val bitmap = BitmapFactory.decodeFile(path)
    val wm: WallpaperManager? = WallpaperManager.getInstance(applicationContext)
    setWallpaper = try {
      wm?.setBitmap(bitmap, null, true, wallpaperType)
      0
    } catch (e: IOException) {
      1
    }

    return setWallpaper
  }
}
That’s it. With just a few lines of code, we can set our Android app wallpaper.

You can check out the full source code of app here. divyanshub024/chitr Chitr: Wallpapers and Backgrounds. Contribute to divyanshub024/chitr development by creating an account on GitHub.github.com
Recommended Reading
Everything you need to know about Flutter page route transition We know how easy it is to navigate from one route to another in Flutter. We just need to do push and pop.medium.com
If you liked this article make sure to 👏 it below, and connect with me on Twitter, Github and LinkedIn. Flutter Community The latest Tweets from Flutter Community (@FlutterComm). Follow to get notifications of new articles and packages from…twitter.com
